Many websites don't give users an option to review their personal information before hitting the infamous 'I agree' button to complete the registration. Everything is done using one single registration page in which the input fields serve two purposes. They are used to gather and review data at the same time. This could save you some time but at the cost of having to edit your profile later on. Sometimes you run out of luck as your name or email has a typo and you need to contact the website administrator to correct it. Not to mention the fact that many website don't let you update your user name. Also, this is not the desired behavior on auction sites, online stores and banking websites. Usually, in theses websites you have to review the transaction before you place a bid, confirm an order or perform a money transfer.
So in this tutorial you will learn how to develop a registration form that spans multiple pages. Moreover, you will learn how to send email notifications with account activation option. This is done using Seam 2 navigation rules and email templates. Let's take a look at some of the screen shots for now.
The first page has the input fields and one button. Clicking on the 'next' button triggers some validation to be performed.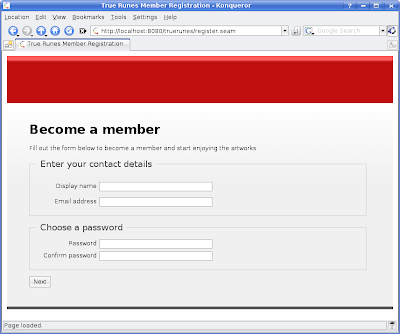
Once the validation is passed the user gets redirected to the second screen which has only output components and two buttons. The 'edit' button sends you back to the first screen while the 'confirm' button completes the registration process. At this point an activation email gets send to you.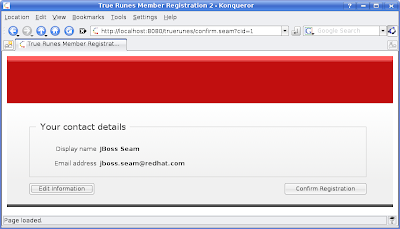
Clicking the link on the email sends you to the third screen. Here a welcome message is displayed possible redirected to the home page.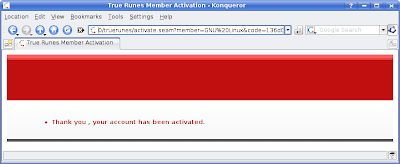
Now that you have seen the screens let take a look at the code.
The database back-end
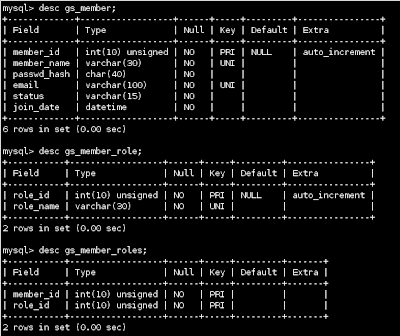
There are two entities, Member and MemberRole, which are mapped to their own tables. There is also a third table that represents the N:M relationship between the two entities.
@Entity(name = "gs_member")
@Name("member")
public class Member implements Serializable {
public static final long serialVersionUID = 596009789001L;
@Id
@GeneratedValue(strategy = AUTO)
@Column(name = "member_id")
private Integer id;
@NotNull
@Length(max = 30, min = 2)
@Column(name = "member_name", unique = true)
private String memberName;
@NotNull
@Length(min = 40, max = 40)
@Column(name = "passwd_hash")
private String passwordHash;
@NotNull
@Length(max = 100)
@Column(unique = true)
private String email;
@NotNull
@Length(max = 15)
private String status;
@NotNull
@Column(name = "join_date")
private Date joinDate;
@ManyToMany
@JoinTable(name = "gs_member_roles",
joinColumns = @JoinColumn(name = "member_id"),
inverseJoinColumns = @JoinColumn(name = "role_id"))
private Set<MemberRole> roles;
}
- The @Entity annotation specifies that this an entity bean and the name attribute specifies the name of the database table that maps to this entity.
- The @Name annotation defines a Seam component with the specified name.
- The @Id annotation is used to indicate the primary key while the @GeneratedValue(strategy = AUTO) annotation instructs the database to set the primary key column using an increment each time a new record is inserted.
- The @NotNull, @Length and @Email are part of hibernate validation.
- In case a property has a different name than the database column it maps to, the @Column annotation can be used to specify the name of the database column and avoid the mismatch. Also, you can specify whether the property is unique or not.
- As I mentioned earlier, there is an M:N relationship between Member and MemberRole. To define this bidirectional relationship, the @ManyToMany annotation is used. Now you need to specify the owning side of the relationship, in our case it is the Member entity so you define the @JoinTable annotation here. For this annotation to work, you need to specify few things. First you define the name of the join table using the name attribute. Second you need to define the foreign keys using the joinColumns and inverseJoinColumn attributes. The joinColumns specify the primary key of the owning entity, Member, while the inverseJoinColumns specify the primary key of the other entity, MemberRole. In both cases the primary keys are simple so only one column is specified.
Here is MemberRole.java:
@Entity(name = "gs_member_role")
@Name("memberRole")
public class MemberRole implements Serializable {
  public static final long serialVersionUID = 596009789002L;

  @Id
  @GeneratedValue(strategy=AUTO)
  @Column(name="role_id")
  private Integer roleId;

  @Column(name="role_name")
  private String name;

  @ManyToMany(mappedBy="roles")
  private Collection<Member> members;

}
Note that MemberRole maintains a collection-based relationship with all its Members. The mappedBy attribute specifies the property of the Member entity bean that defines the relationship.
Tags, Logic and Rules
Now lets move on to the pages, their associated logic and the navigation rules.
<ui:composition template="layout/main_template.xhtml">
<ui:define name="title">True Runes Member Registration</ui:define>
<ui:define name="content">
  <h1>Become a member</h1>
  <p>Fill out the form below to become a member and start enjoying the artworks</p>
  <div id="form-area">

  <h:form id="registration-form">
    <span class="error"><h:messages globalOnly="true"/></span> (0)
    <s:validateAll>
    <fieldset>
      <legend>Enter your contact details</legend>
      <p>
        <h:outputLabel for="membername"
          value="Display name"/>
        <h:inputText styleClass="input-field" id="membername"
          value="#{newMember.memberName}" size="40" maxlength="40"
          required="true"/> (1)
        <h:message styleClass="error" for="membername"/>
      </p>
      <p>
        <h:outputLabel for="email"
          value="Email address"/>
        <h:inputText styleClass="input-field" id="email"
          value="#{newMember.email}" size="40" maxlength="40"
          required="true"> (2)

        </h:inputText>
        <h:message styleClass="error" for="email"/>
      </p>
    </fieldset>

    <fieldset>
      <legend>Choose a password</legend>
      <div>
        <h:outputLabel for="password"
          value="Password"/>
        <h:inputSecret styleClass="input-field" id="password"
          value="#{register.password}" size="40" maxlength="40"
          required="true"/> (3)
        <h:message styleClass="error" for="password"/>
      </div>
      <div>
        <h:outputLabel for="confirm"
          value="Confirm password"/>
        <h:inputSecret styleClass="input-field" id="confirm"
          value="#{register.confirm}" size="40" maxlength="40"
          required="true"/> (4)
        <h:message styleClass="error" for="confirm"/>
      </div>
    </fieldset>


    <div class="submit-buttons">
      <h:commandButton value="Next"
        action="#{register.verify}" id="registerButton"/> (5)
    </div>
    </s:validateAll>
  </h:form>
  </div><!-- // form-area -->
</ui:define>
</ui:composition>
(0) an h:message tag is used to show all the global messages.
(1) and (2) the display name and email are stored in a component called newMember. This component is created and outjected using a factory method of the RegistrationService bean.
(3) and (4) the password and its confirmation are stored in a component called register. The register component compares the two values and calls a method to generate a hash. This hash is then stored in the newMember component.
(5) here the command button calls the verify method of the register component which does some validations as show next.
Snipped code from RegisterService.java
@Stateful
@Name("register")
public class RegisterService implements Register {

  @In(required=false) @Out
  private Member newMember;

  @In(create=true, value="entityManager")
  private EntityManager em;

  /**
   * Password confirmation
   */
  private String password;
  private String confirm;

  private boolean verified;

  @Destroy @Remove
  public void destroy() {}

  public void verify() {
    boolean validPass = validPassword();
    boolean uniqueName = uniqueName();
    boolean uniqueEmail = uniqueEmail();
    verified = validPass && uniqueName && uniqueEmail;
  }

  private boolean validPassword(){
    if(password != null && confirm != null && password.equals(confirm)){
      newMember.setPasswordHash(DigestUtils.shaHex(password));
      return true;
    }
    FacesMessages.instance().add("Passwords do not match");
    return false;
  }

  private boolean uniqueName(){
    try{
      em.createQuery("from gs_member m where m.memberName = :name")
      .setParameter("name", newMember.getMemberName())
      .getSingleResult();
    }catch(NoResultException e){
      return true;
    }
    FacesMessages.instance().add("The display name you specified " +
        "is already taken. Please select another one");
    return false;
  }

  private boolean uniqueEmail(){
    try{
      em.createQuery("from gs_member m where m.email = :email")
      .setParameter("email", newMember.getEmail())
      .getSingleResult();
    }catch(NoResultException e){
      return true;
    }
    FacesMessages.instance().add("The email address you " +
        "specified is already registered in the system.");
    return false;
  }

  @Factory("newMember") @Begin
  public void start() {
    newMember = new Member();
  }
}
- The RegisterService class is defined as a Stateful session bean since each user needs a copy of the bean to store the information across method invocations. As you saw in register.xhtml, Seam manages the 'register' component as defined by the @Name annotation.
- The start method is annotated with @Factory("newMember"), this means it is executed when register.xhtml references the newMember component but it has no value bound to it. After the method finishes execution the newly created component is outjected as indicated by the @Out annotation. Also, the start method is annotated with @Begin so that a new conversation is started when this method is called.
- When the user clicks the next button on register.xhtml the verify method get called.
- The validPassword method simply checks that the password and its confirmation are equal and then creates an SHA hash using the DigestUtil of the Apache commons codec library. I know that Seam has some classes to generate hashes but I find Apache commons easier to use.
- The uniqueName and uniqueEmail methods query the database to make sure that the display name and the email are not used by some other member. Both of the methods gets their input from the newMember component.
- As you have noticed, each of the three methods sets an error message in the FacesMessages component of Seam in case validation isn't passed.
- If all the three methods return true, then the 'verified' propeerty is set to true. This property is used in pages.xml as you will see soon.
Before moving on to the next screen, it is time to see some navigation rules:
  <page view-id="/register.xhtml">
    <navigation from-action="#{register.verify}">
      <rule if="#{not register.verified}">
        <redirect view-id="/register.xhtml"/>
      </rule>

      <rule if="#{register.verified}">
        <redirect view-id="/confirm.xhtml"/>
      </rule>
    </navigation>
  </page>
Here we define the navigation rules for the register.xhtml page as specified by the view-id attribute. A navigation tag corresponds to a method call or hard-coded value. In our case the execution of the register.verify determines which rule to go with as it sets the verify boolean variable. You can think of a rule as a condition that need to be evaluated. The execution of the condition determines whether the body of the rule tag gets executed or not. If the first rule is satisfied then a redirection to register.xhtml is made in which error messages are displayed.
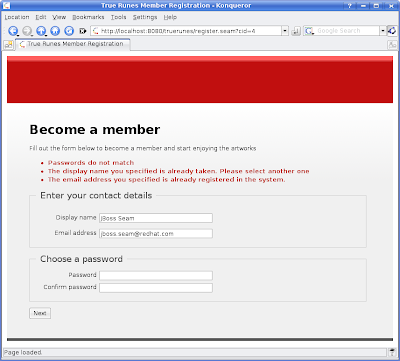
If validation is passed then then the body of the second rule get executed and a redirection to confirm.xhtml page is made. This page is so simple and there is only one thing that need to be mentioned.
<ui:composition template="layout/main_template.xhtml">
<ui:define name="title">True Runes Member Registration 2</ui:define>
<ui:define name="content">
  <div id="form-area">
  <h:form id="registration-form">
    <span class="errors"><h:messages globalOnly="true"/></span>
    <fieldset>
      <legend>Your contact details</legend>
      <p>
        <h:outputLabel for="membername"
          value="Display name"/>
        <h:outputText styleClass="output-field" id="membername"
          value="#{newMember.memberName}"/>
      </p>
      <p>
        <h:outputLabel for="email"
          value="Email address"/>
        <h:outputText styleClass="output-field" id="email"
          value="#{newMember.email}"/>
      </p>
    </fieldset>

    <div class="submit-buttons">
      <h:commandButton styleClass="edit-button" value="Edit Information"
        action="edit" id="editButton"/>
      <h:commandButton styleClass="conf-button" value="Confirm Registration"
        action="#{register.confirm}" id="registerButton"/>
    </div>
  </h:form>
  </div>
</ui:define>
</ui:composition>
The edit button has an action set to 'edit' rather than an EL. Seam gives you the flexibility to specify literals as form actions. This is to avoid having to call a method just to return a literal value.
  <page view-id="/confirm.xhtml">
    <navigation from-action="edit">
      <redirect view-id="/register.xhtml"/>
    </navigation>
    <navigation from-action="#{register.confirm}">
      <redirect view-id="/home.xhtml"/>
    </navigation>
  </page>
You can see that form-action attribute of the navigation tag is set to the same value as the action attribute of the edit button. This causes the body of the tag to be executed right away.
As the user gets redirected to register.xhtml the conversation id is passed as parameter in the URL, sid=1 in this case. Remember, the conversation started as a result of calling the start method which has the @Begin annotation.
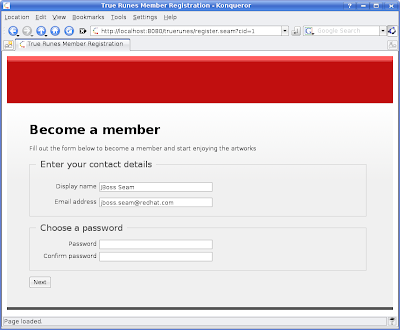
Unlike register.xhtml , confirm.xhtml has two navigation actions and no nested rule tags. The second navigation action calls register.confirm described next:
public class RegisterService implements Register {

  @In(required=false) @Out
  private Member newMember;

  @In(create=true, value="entityManager")
  private EntityManager em;

  @In(create=true)
  private Renderer renderer;

  private String activationCode;

  @End
  public void confirm() throws LoginException {
    newMember.setJoinDate(new Date());
    newMember.setRoles(new HashSet<MemberRole>());
    newMember.setStatus(MemberStatus.INACTIVE.getStatus());

    MemberRole userRole = (MemberRole)em.createQuery(
        "from gs_member_role where role_name = 'user'")
        .getSingleResult();
    newMember.getRoles().add(userRole);
    em.persist(newMember);
    // to be discussed later
    this.activationCode = TrueRunesUtil.getActivationCode(
        newMember.getMemberName());
    this.sendRegistrationEmail();
  }

}
The first thing the confirm method does is setting the remaining properties of the newMember component. It also creates an instance of type MemberRole with the value of user and adds it to the list of roles the new member belongs to. Next the newMember component is persisted in the database.
Email Notification
Now comes the time to generate the activation code and send the registration email to the new member. Generating the activation code has been moved to a utility class as shown:
public class TrueRunesUtil {
  public static String getActivationCode(String memberName){
    String raw = "TrueRunes".concat(memberName);
    return DigestUtils.md5Hex(raw);
  }
}
Again DigestUtils of the Apache Commons codec library is used to generate an md5 hash that is used as an activation code. After getting the activation code, the confirm method calls the sendRegistrationEmail to actually send the email.
public class RegisterService implements Register {

  @In(create=true)
  private Renderer renderer;

  private String activationCode;

  public String getActivationCode(){
    return this.activationCode;
  }

  private void sendRegistrationEmail(){
    try{
      this.renderer.render("WEB-INF/registration.xhtml");
      FacesMessages.instance().add("Mail Sent.");
    }catch(Exception e){
      FacesMessages.instance().add("Email sending failed: "+e.getMessage());
      e.printStackTrace();
    }
  }

}
The sendRegistrationEmail method uses Seam Mail support to send the registration email. It calls the render method of the renderer component to generate the email from a predefined template called registration.xhtml.
<m:message xmlns="http://www.w3.org/1999/xhtml"
xmlns:m="http://jboss.com/products/seam/mail"
xmlns:h="http://java.sun.com/jsf/html"
xmlns:f="http://java.sun.com/jsf/core">
  <m:from name="Admin">admin@truerunes.com</m:from>
  <m:to name="#{newMember.memberName}" address="#{newMember.email}"/>
  <m:subject>TrueRunes Account Activation</m:subject>
  <m:body>
    <p>Dear #{newMember.memberName},</p>
    <h:outputText value="Please click the following link to activate your account: "/>
    <h:outputLink value="activate.seam">
      <h:outputText value="activate my account"/>
      <f:param name="member" value="#{newMember.memberName}"/>
      <f:param name="code" value="#{register.activationCode}"/>
    </h:outputLink>
    <br/>
    <p>If the link above does not work then please use the following link:</p>
    <span>http://www.truerunes.com/activate.seam?member=#{newMember.memberName}&code=#{register.activationCode}</span>

    <f:facet name="alternative">Dear #{newMember.memberName},
    Please copy the following link and paste it into the location bar to
    activate your account:
http://www.truerunes.com/activate.seam?member=#{newMember.memberName}&code=#{register.activationCode}
    </f:facet>
  </m:body>
</m:message>
registration.xhtml happens to be another Facelets template that uses new tags provided by Seam. The m:message tags defines the email message and encloses all other tags. The m:from tag defines the sender of the message and gets this information of the newMember component. You can have more than one m:to tag to define recipients and you can enclose it within ui:repeat to iterate through a predefined list of members. The m:body defines the content of the email and can accept custom tags as well as standard HTML tags. As you can see I have used different tags including p, br, h:outputLink, f:param and others. One thing to note here is the f:facet tag which define an alternative message in case your mail client does not support HTML based emails.
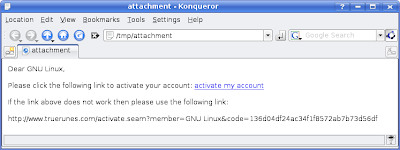
As you can see in this screenshot, a link with the activation code and member name is constructed. These two values are passed as parameters to activate.xhtml which defines h:messages as its only content:
<ui:composition template="layout/main_template.xhtml">
<ui:define name="title">True Runes Member Activation</ui:define>
<ui:define name="content">
  <span class="error"><h:messages globalOnly="true"/></span>
</ui:define>
</ui:composition>
</html>
The activate logic resides in a method called activate in a Stateless session bean called ActivationService. The activate method is defined in pages.xml as a page action for activate.xhtml:
<page view-id="/activate.xhtml" action="#{activationService.activate}"/>
Here is the ActivationService class:
@Stateless
@Name("activationService")
public class ActivationService implements Activation{
  @RequestParameter("code")
  private String activationCode;

  @RequestParameter("member")
  private String name;

  @In(create=true, value="entityManager")
  private EntityManager em;

  public void activate(){
    if(activationCode != null && !activationCode.trim().equals("") &&
        name != null && !name.trim().equals("")){
      String code = TrueRunesUtil.getActivationCode(name);
      if(code.equals(activationCode)){
        this.updateMemberAccount();
        FacesMessages.instance().add("Thank you #{name}, your " +
            "account has been activated.");
        return;
      }else{
        System.err.println("Invalid activation code");
      }
    }
    FacesMessages.instance().add("Could not activate member account");
  }

  private void updateMemberAccount(){
    String query = "UPDATE gs_member m SET m.status = :newStatus " +
        "WHERE m.memberName = :name";
    em.createQuery(query)
      .setParameter("name", name)
      .setParameter("newStatus", MemberStatus.ACTIVE.getStatus())
      .executeUpdate();
  }
}
The @RequestParameter is used to instruct Seam to set the values of activationCode and member from the parameters passed in the URL. The activate method does some validation, compute the hash and compare it with the one in the URL. If everything goes well, the status is updated in the database and a thanks message is shown on activate.xhtml.
For some reason Yahoo! Mail did not render the activation link and displayed plain text. Yahoo! treated the body and the alternate as attachments.

That is it, I hope you will make use of this tutorial :)
17 comments:
Good stuff!
Opps!! it is rite sample for me!!
Could you send me the src? chamjoneu@gmail.com
Thanks a lot ^^*
Hi Chris Or Cham
This is a great tutorial, but I have some problem to do it, could you send me the src at danieljdenis@gmail.com I'll apreciate.
Thanks
Denis
I needed to change to code a small bit to get it to work.
I moved the instance variable declaration to the top of the class with an initialization:
private Set< Role> roles = new HashSet< Role>(0);
Otherwise hibernate would give me an error on load.
Great post that was extremely helpful.
Thanks
---rdf
Article is very good for starters like me.
Seems like I am not able to send the email.
Can you please send me the code to venkatsep14@gmail.com
Thanks
Venkat.
Very nice Article. I´m a beginner with Seam Framework. But not everything work fine.
Can you please send me the Code to Wahlhalla@gmx.de.
Thanks a lot
Björn
Hey can you send me the source to doshi.priyank@gmail.com
I like your forms ... very clean looking. Thanks for the point in the right direction on how to use Seam's mail mechanism. That's what, couple of lines of code for submitting an email? Doesn't get much better than that!
realy a great tutorial, might it be possible to get the sources, i have still many errors, that i can't solve and maybee ur source would help me :-(
email: mo2p@bendorbreak.ch
I had much of the site template built and so with that your example took me about an hour to get working. Very, very helpful, thanks for your code. I also like your code, it's very modular. :)
Some changes I would make to your example:
- It appears that several people in the Seam community are suggesting its better to use the begin-conversation and end-conversation elements in your pages.xml file rather than using the Begin and End annotations.
- Your updateMemberAccount has a potential security risk which is that if you are using many different status codes, specifically ones that are considered 'higher' than the ACTIVE state (e.g., GOLD_MEMBER), then if the user has bookmarked the link for the hash code, they may 'roll back' their account status. Worse, which is highly improbable, but still possible, is that someone could guess (or randomly enter) hash codes for user accounts with the possibility of rolling back account status. A simple check should be sufficient to fix that.
- Make the ActivationService class's scope of type EVENT since that's all that it's being used for.
Anyways, thanks again.
Thanks for your great work!
I've tried your example working.
But I am new in seam, it is not easy at all.
Could you send me your source for this article?
franticlion@gmail.com
I'll really appreciate it
Thanks.
Seems nice BUT when I tried to use it the way you described I always get the following exception: java.lang.IllegalStateException: Application was not properly initialized at startup, could not find Factory: javax.faces.context.FacesContextFactory
I then tried to raise an event and observe it (synch and asynch) within the class and within a separate class, send the mail within a new Thread, set a new context and so on. Always the same exception in different colors.
The only thing that works and only hell knows why is to raise the event within pages.xml and define the action in components.xml.
Any idea?
Great tutorial!
Can you send me the source, because I have some error.
dojahd@gmail.com
Thanks
Nice example, could you send the complete source to ludiwei@gmail.com
thanks a lot.
Nice example, could you send the complete source to corneliuenero@gmail.com
thanks a lot.
Good example. Can you send me the complete source at narjeetsoni@gmail.com
Thanks a lot
Post a Comment